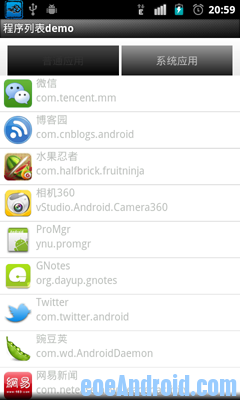
主要的功能
- 自定义Button(TextView来做Button)
- 通过点击不同的Button显示系统程序和应用程序
- 更改ListView选中时的背景色
PackageManager的功能:
•安装,卸载应用
•查询permission相关信息
•查询Application相关信息(application,activity,receiver,service,provider及相应属性等)
•查询已安装应用
•增加,删除permission
•清除用户数据、缓存,代码段等
先看看效果图,风格可以自己调整


代码就暂时不特别规范的写了,只是测试程序
main.xml,整体布局,默认TextView是没有事件监听的,需要设置其android:clickable属性为true
-
- <?xml version="1.0" encoding="utf-8"?>
- <LinearLayout xmlns:android="http://schemas.android.com/apk/res/android"
- android:layout_width="fill_parent"
- android:layout_height="fill_parent"
- android:background="@drawable/background_color"
- android:orientation="vertical" >
- <LinearLayout
- android:layout_width="fill_parent"
- android:layout_height="10dip"
- />
- <LinearLayout
- android:layout_width="fill_parent"
- android:layout_height="40dip"
- >
- <TextView
- android:id="@+id/button01"
- android:layout_width="fill_parent"
- android:layout_height="fill_parent"
- android:layout_weight="1"
- android:text="普通应用"
- android:gravity="center"
- android:background="@drawable/button_selector"
- android:focusable="true"
- android:clickable="true"
- android:layout_marginLeft="10dip"
- />
- <View android:layout_width="5px" android:layout_height="fill_parent"
- android:background="#FFFFFFFF"/>
- <TextView
- android:id="@+id/button02"
- android:layout_width="fill_parent"
- android:layout_height="fill_parent"
- android:layout_weight="1"
- android:text="系统应用"
- android:gravity="center"
- android:background="@drawable/button_selector"
- android:focusable="true"
- android:clickable="true"
- android:layout_marginRight="10dip"
- />
- </LinearLayout>
- <ListView
- android:id="@+id/lv"
- android:layout_width="fill_parent"
- android:layout_height="wrap_content"
- android:fastScrollEnabled="true">
-
- </ListView>"
- </LinearLayout>
-
ListView的item布局:listitem.xml,这里ImageView的大小最好设置为固定的,如果是wrap_content的话,不同应用程序的图标不一样大,显示出来很难看
-
- <?xml version="1.0" encoding="utf-8"?>
- <LinearLayout xmlns:android="http://schemas.android.com/apk/res/android"
- android:layout_width="match_parent"
- android:layout_height="match_parent"
- android:background="@drawable/list_item_color_bg"
- android:orientation="horizontal" >
- <ImageView
- android:id="@+id/appicon"
- android:layout_width="48dip"
- android:layout_height="48dip"
- android:padding="5dp"
- />
- <LinearLayout
- android:orientation="vertical"
- android:layout_width="fill_parent"
- android:layout_height="wrap_content"
- >
- <TextView
- android:id="@+id/appName"
- android:layout_width="fill_parent"
- android:layout_height="wrap_content"
- />
- <TextView
- android:id="@+id/packageName"
- android:layout_width="fill_parent"
- android:layout_height="wrap_content"
- />
- </LinearLayout>
- </LinearLayout>
-
下面的是drawable下的一些文件
background_color.xml
-
- <?xml version="1.0" encoding="utf-8"?>
- <shape xmlns:android="http://schemas.android.com/apk/res/android" >
- <gradient
- android:startColor="#FFFFFFFF"
- android:endColor="#FFFFFFFF"
- android:angle="270.0"
- android:centerY="0.3"
- android:centerColor="#FFBDBDBD"
- />
- </shape>
-
button_color.xml
-
- <?xml version="1.0" encoding="utf-8"?>
- <shape xmlns:android="http://schemas.android.com/apk/res/android" >
- <gradient
- android:startColor="#FF7F7F7F"
- android:endColor="#FF000000"
- android:angle="270.0"
- />
- </shape>
-
button_selector.xml,这是点击TextView自定义的Button的selector文件
-
- <?xml version="1.0" encoding="utf-8"?>
- <selector xmlns:android="http://schemas.android.com/apk/res/android"
- android:constantSize="true" >
- <!-- 获得焦点时的背景图片 -->
- <item
- android:state_focused="true"
- >
- <shape>
- <gradient
- android:startColor="#FFE5CF33"
- android:endColor="#FFF1E7A2"
- android:angle="90.0"
- />
- </shape>
- </item>
- <!-- 设置响应所有事件 -->
- <item android:state_enabled="true"
- android:state_pressed="false"
- >
- <shape>
- <gradient
- android:startColor="#FF1B1B1B"
- android:endColor="#FF969696"
- android:angle="90.0"
- />
- </shape>
- </item>
- <!-- 按钮点击时候的背景 -->
- <item android:state_enabled="true"
- android:state_pressed="true">
- <shape>
- <gradient
- android:startColor="#FF000000"
- android:endColor="#FF474747"
- android:angle="90.0"
- />
- </shape>
- </item>
- <item android:state_enabled="false"
- android:state_pressed="true">
- <shape>
- <gradient
- android:startColor="#FF000000"
- android:endColor="#ff474747"
- android:angle="90.0"
- />
- </shape>
- </item>
- <!-- 默认情况下的背景 -->
- <item>
- <shape>
- <gradient
- android:startColor="#FF000000"
- android:endColor="#FF474747"
- android:angle="90.0"
- />
- </shape>
- </item>
- </selector>
-
list_item_color_bg.xml,这是点击ListView时item自定义的选中背景
-
- <?xml version="1.0" encoding="utf-8"?>
- <selector xmlns:android="http://schemas.android.com/apk/res/android" >
- <item
- android:state_pressed="true"
- android:drawable="@color/green"
- ></item>
- <item
- android:drawable="@color/white"
- ></item>
- </selector>
-
这里有几点注意
- 点击不同按钮后需要切换不同的视图,此时由于数据源已经改变,所以需要点击后立即变成改变后的结果,所以需要刷新ListView,使用adapter.notifyDataSetChanged()方法即可刷新ListView
- 系统应用程序和普通应用程序我放到了不同的ArrayList中了,如果感觉这部分设计有问题的话,希望高手指点
-
- package com.loulijun.appshow;
-
- import java.util.ArrayList;
- import java.util.HashMap;
- import java.util.List;
- import java.util.Map;
-
- import android.app.Activity;
- import android.content.Context;
- import android.content.pm.ApplicationInfo;
- import android.content.pm.PackageInfo;
- import android.content.pm.PackageManager;
- import android.os.Bundle;
- import android.view.LayoutInflater;
- import android.view.View;
- import android.view.ViewGroup;
- import android.widget.BaseAdapter;
- import android.widget.ImageView;
- import android.widget.ListView;
- import android.widget.TextView;
- import android.widget.Toast;
- public class AppShowActivity extends Activity {
- /** Called when the activity is first created. */
- private TextView customAppsBtn, systemAppsBtn;
- private ListView lv;
- private List<PackageInfo> customApps; // 普通应用程序
- private List<PackageInfo> systemApps; // 系统应用程序
- MyAdapter adapter;
- @Override
- public void onCreate(Bundle savedInstanceState) {
- super.onCreate(savedInstanceState);
- setContentView(R.layout.main);
- customAppsBtn = (TextView)findViewById(R.id.button01);
- systemAppsBtn = (TextView)findViewById(R.id.button02);
- lv = (ListView)findViewById(R.id.lv);
- //加载系统应用和普通应用程序
- loadApps();
- adapter = new MyAdapter(this, customApps);
- lv.setAdapter(adapter);
-
- customAppsBtn.setOnClickListener(new TextView.OnClickListener()
- {
- @Override
- public void onClick(View v) {
- Toast.makeText(getApplicationContext(), "普通应用", Toast.LENGTH_SHORT).show();
- //切换到普通程序列表
- updateAppList(customApps);
- }
-
- });
- systemAppsBtn.setOnClickListener(new TextView.OnClickListener()
- {
- @Override
- public void onClick(View v) {
- Toast.makeText(getApplicationContext(), "系统应用", Toast.LENGTH_SHORT).show();
- //切换到系统程序列表
- updateAppList(systemApps);
- }
-
- });
- }
-
- //列出普通应用程序
- private void loadApps()
- {
-
- customApps = new ArrayList<PackageInfo>();
- systemApps = new ArrayList<PackageInfo>();
- //得到PackageManager对象
- PackageManager pm = this.getPackageManager();
- //得到系统安装的所有程序包的PackageInfo对象
- List<PackageInfo> packages = pm.getInstalledPackages(0);
- for(PackageInfo pi:packages)
- {
- //列出普通应用
- if((pi.applicationInfo.flags&ApplicationInfo.FLAG_SYSTEM)<=0)
- {
- customApps.add(pi);
- }
- //列出系统应用,总是感觉这里设计的有问题,希望高手指点
- if((pi.applicationInfo.flags&ApplicationInfo.FLAG_SYSTEM)>0)
- {
- systemApps.add(pi);
- }
- }
- }
-
- private void updateAppList(List<PackageInfo> apps)
- {
- adapter.setData(apps);
- adapter.notifyDataSetChanged();
- }
-
- //ViewHolder静态类
- static class ViewHolder
- {
- public ImageView appicon;
- public TextView appName;
- public TextView packageName;
- }
-
- class MyAdapter extends BaseAdapter
- {
- private LayoutInflater mInflater = null;
- private List<PackageInfo> apps;
- private MyAdapter(Context context, List<PackageInfo> apps)
- {
- this.mInflater = LayoutInflater.from(context);
- this.apps = apps;
- }
- //setData()要在MyAdapter类里设置,用于设置数据源
- public void setData(List<PackageInfo> apps)
- {
- this.apps = apps;
- }
- @Override
- public int getCount() {
- // TODO Auto-generated method stub
- return customApps.size();
- }
- @Override
- public Object getItem(int position) {
- // TODO Auto-generated method stub
- return position;
- }
- @Override
- public long getItemId(int position) {
- // TODO Auto-generated method stub
- return position;
- }
- @Override
- public View getView(int position, View convertView, ViewGroup parent) {
- ViewHolder holder = null;
-
-
- if(convertView == null)
- {
- holder = new ViewHolder();
-
- convertView = mInflater.inflate(R.layout.list_item, null);
- holder.appicon = (ImageView)convertView.findViewById(R.id.appicon);
- holder.appName = (TextView)convertView.findViewById(R.id.appName);
- holder.packageName = (TextView)convertView.findViewById(R.id.packageName);
- convertView.setTag(holder);
- }else
- {
- holder = (ViewHolder)convertView.getTag();
- }
- PackageManager pm = getPackageManager(); // 得到pm对象
- PackageInfo info = apps.get(position);
- ApplicationInfo appInfo = info.applicationInfo;
-
- holder.appicon.setImageDrawable(pm.getApplicationIcon(appInfo));
- holder.appName.setText(pm.getApplicationLabel(appInfo));
- holder.packageName.setText(appInfo.packageName);
- return convertView;
- }
-
- }
- }


